Sweet Treats for a homemade Halloween
In lieu of the store-bought stuff, why not whip up a batch of homemade Halloween treats? We’re sure that your little monsters will enjoy a spooky selection of creepy cookies and ghoulishly good bakes.
Eat, drink and be scary
We’ve selected a few fa-boo-lous sweet treats that you can create and bake in your own kitchen this All Hallows Eve – all including ingredients that you can get delivered to your front door from Foulger’s Dairy.
Did you know… During the ancient Celtic festival of Samhain, priests used cats as part of a ritual to try to predict the future. They’ve been a part of the Halloween history for centuries!.
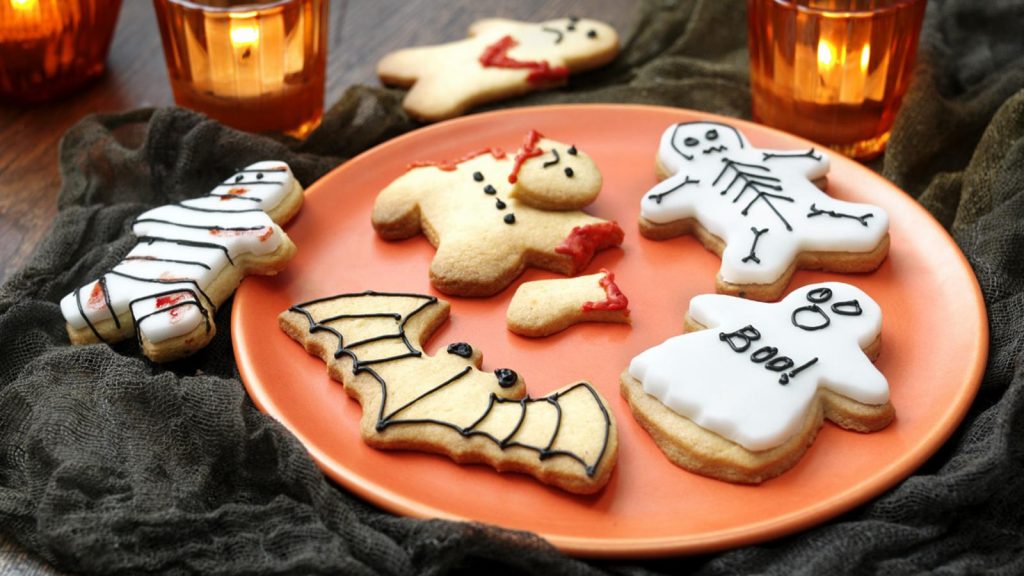
Bone appetit!
Our first sweet treat comes from the BBC and is an easy, tasty take on the classic cookies that we enjoy all year around. These mischievous mummy’s and frightening ghosts are bound to go down well with the kids and adult alike.
Ingredients
250g unsalted butter, softened
250g golden caster sugar
2 free-range eggs, lightly beaten
½ tsp vanilla extract
500g plain flour
red and black food colour (optional)
1 tsp baking powder
Halloween-themed cookie cutters
red, white and black writing icing
200g ready-to-roll fondant icing
1 tsp apricot jam, warming with 1 tsp water
Preparation
Step 1—Beat the butter and sugar in a large bowl, preferably using an electric mixer, until light and fluffy. Beat in the eggs and vanilla extract. (If the mixture looks a little curdled, add a spoonful of flour.) If you’re using food colouring, add a few drops to the mixture.
Step 2– Sift together the flour and baking powder in a separate bowl. Stir the flour into the butter mixture and work into a dough using floured hands. Turn onto a floured work surface and knead into a ball (the dough will be quite wet). Divide the dough into two portions, wrap in cling film and leave to chill in the fridge for at least one hour.
Step 3 – Preheat the oven to 170C/325F/Gas 3. Line two baking trays with greaseproof paper.
Step 4 – Roll the dough out to a 0.5cm/¼in thickness on lightly floured work surface. (It’s best to roll out one portion of the dough at a time, leaving the remainder in the fridge.) Cut shapes out with the Halloween cutters. Take a few limbs and heads off the gingerbread man for added gore.
Step 5 – Place the cookies onto the baking tray, leaving a gap between them in case they spread a little.
Step 6 – Bake for 12-15 minutes, leave on the tray for 10 minutes and then move to a wire rack to finish cooling.
Step 7 – Once cool, let your imagination run wild. Use the red writing icing along the edges of the missing limbs and heads as blood. For the skeletons and mummies, roll the fondant icing out to a 0.5cm/¼in thickness on a work surface dusted with icing sugar and cut out shapes using the same cutters as the cookies. Brush the cookies with the warmed apricot jam and stick the icing onto the cookies. Decorate with the white and black writing icing.
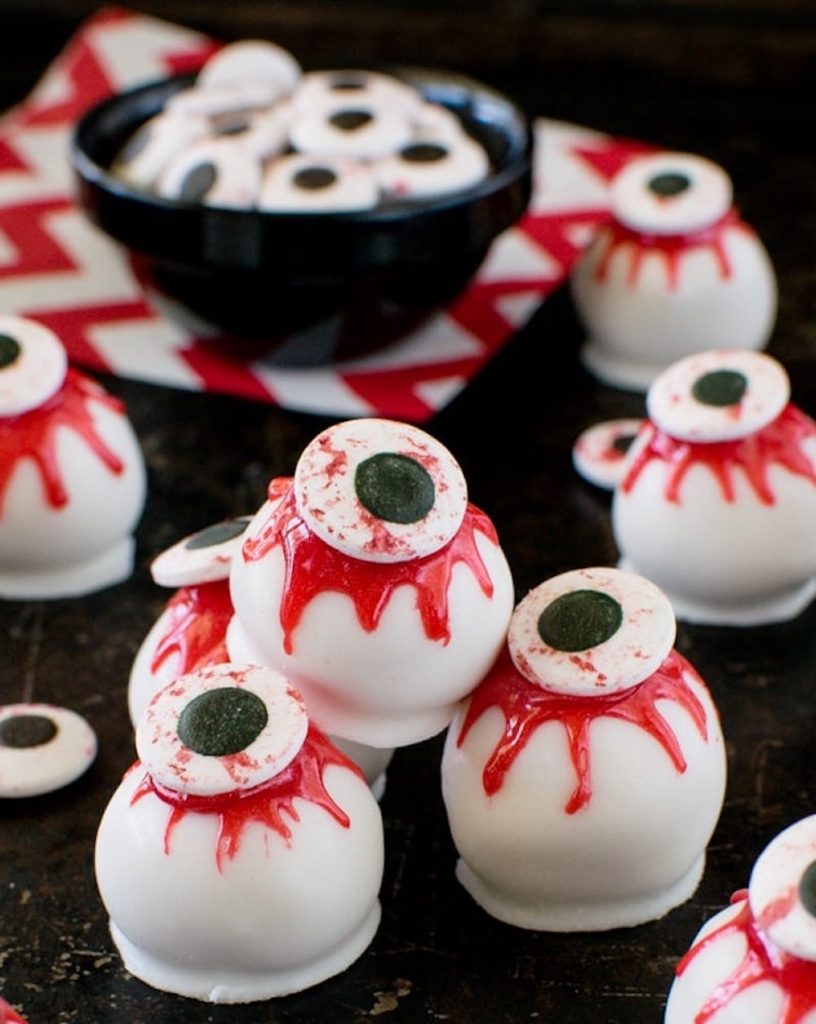
Eye like the look of these…
Serve up some eye-popping fun this year! Oozing red gel frosting and a candy eye add a fun and spooky flair to these easy peanut butter zombie eyeballs! An awesome treat for Halloween from Inside BruCrew Life.
Ingredients:
6 tsp butter, softened
65g creamy peanut butter
30g marshmallow creme
½ tsp vanilla extract
pinch of salt
250g powdered sugar
1 bag white candy melts
1 tub red sparkle gel
36 large candy eyes
Preparation
Step 1 – Mix together the butter, peanut butter, marshmallow, vanilla, and salt until creamy.
Step 2 – Slowly add the powdered sugar and mix until a soft dough forms.
Step 3 – Roll the mixture into 36 even balls. Place on a wax paper lined tray and refrigerate for at least 30 minutes.
Step 4 – Melt the chocolate according to the package directions. Use a toothpick to dip each peanut butter ball. Place on the wax paper lined tray. Cover the toothpick hole with more chocolate. Let set.
Step 5 – Squeeze a circle of red gel on the top of each peanut butter ball. Use a toothpick to drag the side down the sides of each truffle. Top with the candy eyes. Let set. Store in a loosely sealed container. Makes 36 peanut butter zombie eyeballs.
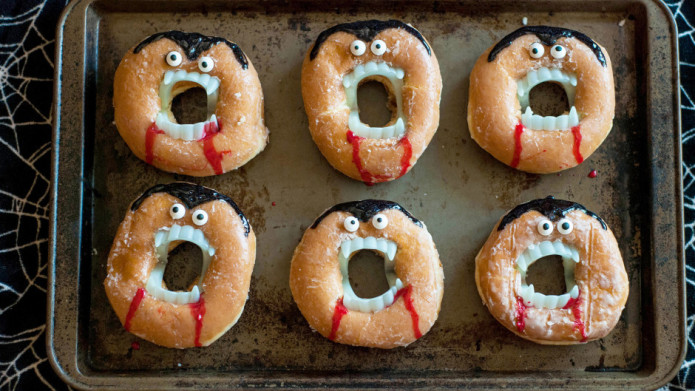
Devilishly simple
This Halloween treat is guaranteed to deliver the most laughs for the least effort. From She Knows comes the no-bake vampire doughnut. Perfect for those who can’t tackle a full bake or as a fun food project to keep your little monsters being “bored to death” this Halloween.
Ingredients:
Pick up a dozen of your favourite doughnuts
12 pairs of plastic fake vampire teeth
24 mini candy eyes (or white and black decorating gel)
Red decorating gel
Preparation:
Step 1 – Take a pair of the vampire teeth, and hold them closed.
Step 2– Gently place the teeth in the centre of a doughnut, and then carefully allow the teeth to open. Wiggle the teeth so that they fit perfectly into the centre of the doughnut, and place the doughnut onto a serving plate.
Step 3 – Repeat with the remaining doughnuts and vampire teeth until all the vampires are made.
Step 4 – For each pair of vampire eyes, lightly moisten the backs of 2 candy eyes, and gently press them to the doughnut so they stick. If using the black and white decorating gels to make the eyes, then first place 2 drops of white gel onto each doughnut, followed by a smaller drop of black gel directly onto each white gel eye.
Step 5 – Use the red decorating gel to draw blood around the teeth of the doughnuts
Step 6 – If desired, use the black gel to draw a widow’s peak onto each doughnut or on random doughnuts.
Step 7 – Allow the gel to dry about 20 minutes, and serve.
If one of these treats caught your eye, be sure to head over to the Milk & Dairy section to stock up on your milk, eggs and butter to make these fang-tastic treats!
From everyone at Foulgers Dairy, have a happy Halloween!